Procreate Animated Brushes: How to Get the Wiggle Effect in 2026
Procreate brushes do not animate by themselves. Every brush in Procreate paints a still mark, so the wiggle, or “boiling line”, effect you see on social media is made with Animation Assist: you draw the same picture on 2 to 4 frames with tiny differences and loop them at around 8 to 12 frames per second. This guide walks through that method step by step, checked against the official Procreate Handbook as of September 2026, then shows the shortcut: Doodraw, where every stroke starts wiggling the moment you draw it.

Does Procreate have animated brushes?
Short answer: no, not brushes that move after you lift the pencil.
The Brush Studio settings in the Procreate Handbook include plenty of jitter. Jitter Lateral “controls how much the brush stamps will shift perpendicular to your stroke,” and there are jitter controls for spacing, shape roundness and grain. All of that randomness happens once, while you paint. When the stroke is finished, it is a still image on a layer. Nothing in Brush Studio replays or shifts the stroke over time.
That is why searches for “Procreate animated brushes” lead to three different things:
- Brushes that look shaky. Jitter, grain and textured edges make a line look hand-drawn and a little nervous. That helps a boil look good, but the line does not move.
- Third-party boil or wiggle brush packs. Sets sold on marketplaces under names like “wiggle” or “shaky line” are, as far as we could verify, the same thing: brushes with irregular edges and texture. We could not find a Procreate brush file that animates by itself, and the .brush format is built on Brush Studio settings, which do not include motion. If a pack promises animated brushes, check whether it actually includes an animation template or instructions for Animation Assist.
- The Procreate Dreams “Wiggle” set. Procreate Dreams, the separate animation app from the same company, has an Animation Brushes library that includes a set called Wiggle (with brushes named Buzzy, Vanishing and Sparrowhawk, among others). The handbook lists the names but does not describe any of them as moving on their own. In Dreams, motion still comes from frames, keyframes or performing.
So the honest answer: in Procreate, the wiggle comes from frames, not from the brush.
How the wiggle effect works
A wiggle loop is the same drawing traced a few times. Nothing in the picture moves on purpose: the lines just land a hair apart each time, and when the frames loop, the outline seems to bubble. We explain the history and theory in our guide to boiling lines animation; here is the short version in one picture.
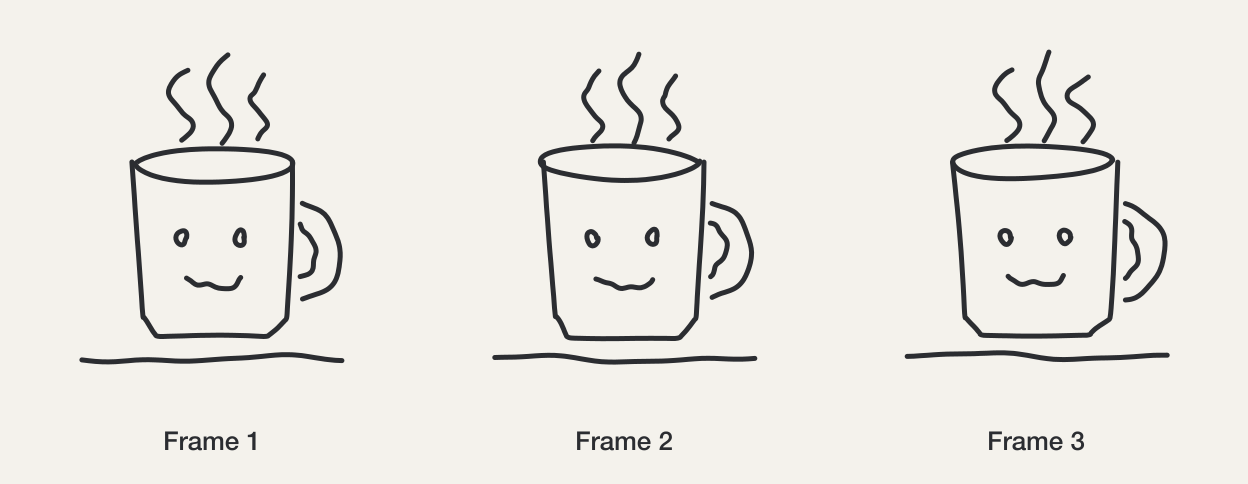
Loop those three frames and you get this:

Two settings decide the feel:
- How different the frames are. Small differences give a soft shimmer, big ones a nervous scribble.
- How fast they cycle. Slow feels calm, fast feels jittery.
How to make the wiggle effect in Procreate, step by step
Procreate’s animation tool is called Animation Assist. It turns each layer into a frame. According to the Animation Assist interface page, “the bottom layer of your Layers panel will be the far left frame in the Timeline,” and grouped layers count as a single frame. Keep that in mind: every step below is really about layers.
1. Draw your line art on one layer
Start with a clean drawing. Bold outlines with few details boil best. Choose a brush with a bit of texture (the pencils and inks work well) so the retraced lines look hand-drawn.
If your drawing has flat color, keep the color on its own layer. You will decide in step 6 whether it stays still or boils with the lines.
2. Turn on Animation Assist
Tap the wrench to open the Actions menu, tap Canvas, and flip the Animation Assist toggle. A Timeline appears at the bottom of the screen with your layers shown as frames. Onion skin is on by default, so you will see neighbouring frames as faint ghosts.
3. Duplicate the frame twice
Tap your frame in the Timeline, then tap it again to open the frame options. The Options page lists Hold Duration, Duplicate and Delete, plus Foreground and Background. Tap Duplicate twice to get three identical frames.
Three frames is the classic choice. Two is enough for a visible boil, four gives a slightly smoother shimmer.
4. Make each copy slightly different
Right now the three frames are identical, so nothing moves. You have three ways to add variation. Pick one, or mix them.
Option A: retrace (the most hand-drawn look). Instead of duplicating in step 3, tap Add Frame to create blank frames, then trace over the onion skin of frame 1 at your normal speed. Do not try to be precise: the small errors are the effect. Trace every new frame from frame 1, not from the one before it, or the drawing slowly slides across the canvas.
Option B: Liquify (fastest). Select frame 2, tap Adjustments, then Liquify. The Liquify page lists Push, Twirl, Pinch, Crystals, Edge and Reconstruct modes. Use Push with a large Size and low Pressure, and drag very gently across the drawing in a few places. Do the same on frame 3 in different spots. Keep it subtle: a few pixels is enough.
Option C: Warp. Select frame 2, open Transform, and tap Warp. The Warp page describes a mesh you can drag “to warp any part of your content in any direction.” Pull one or two points of the mesh by a tiny amount. Repeat on frame 3 with different points.
Retracing looks the most natural because every line changes independently. Liquify and Warp are quicker but move whole regions at once, so the boil can look more like a gentle wobble than a scribble.
5. Set Loop and the frame rate
Tap Settings in the Animation Assist toolbar. The Settings page offers three playback modes, Loop, Ping Pong and One Shot, and a frame rate from 1 to 60 frames per second.
- Choose Loop for the classic boil (1, 2, 3, 1, 2, 3).
- Ping Pong plays forward then backward (1, 2, 3, 2, 1), which gives more steps from the same three drawings.
- Start at 8 to 12 frames per second, then adjust by eye.
| Frame rate | Feel | Good for |
|---|---|---|
| 4 to 6 fps | Slow, calm | Backgrounds, quiet illustrations |
| 8 to 12 fps | Lively but readable | Characters, stickers, most wiggle art |
| 15 to 24 fps | Busy, almost vibrating | Titles, reactions, short shocks |
The same Settings panel controls onion skin: Onion skin frames goes from None to 12, with an opacity slider, a Blend primary frame toggle, and colors for the frames ahead (green by default) and behind (red by default). For boiling lines, one or two onion skin frames at low opacity is plenty.
6. Decide what stays still
Because each frame is a layer, anything not included in a frame disappears on the other frames. You have two options:
- Color that stays still: put it on the bottom layer and set that frame as Background. The handbook explains that only the leftmost frame can be the Background, and it sits under every other frame.
- Color that boils with the lines: put a line layer and a color layer in a group for each frame. Animation Assist treats each group as one frame.
There is also a Foreground option for the rightmost frame, useful for a still frame border or text that should not wiggle.
7. Export the loop
Tap Actions, then Share, then pick an animated format. The Animation Share page lists four:
| Procreate format | Transparent background | Notes from the handbook |
|---|---|---|
| Animated GIF | Yes, as an option | Also offers dithering and a per-frame color palette |
| Animated PNG | Yes | ”Ideal for animations with transparent elements” |
| Animated MP4 | No | JPEG encoded frames, so no transparency, smaller files |
| Animated HEVC | Yes | Transparency plus small file sizes |
Each export lets you choose Max Resolution or Web Ready and adjust frames per second. The handbook notes that only visible layers are exported, so hide the background color layer if you want transparency.
The Procreate method at a glance
| Step | Where in Procreate | Time |
|---|---|---|
| Turn on Animation Assist | Actions, Canvas | Seconds |
| Make 3 frames | Frame options, Duplicate or Add Frame | Seconds |
| Vary each frame | Retrace, Liquify or Warp | 5 to 30 minutes, depending on the drawing |
| Set Loop and fps | Animation Assist, Settings | Seconds |
| Export | Actions, Share, Animated GIF, PNG, MP4 or HEVC | A minute |
The slow part is always step 4, and it grows with every element you add. A single doodle is quick. A full illustration where each character, plant and letter should boil means retracing all of it, three times.
What about Procreate Dreams?
Procreate Dreams is the frame-by-frame and keyframe animation app from the makers of Procreate, on iPad only. For a boil, the relevant tool is the Flipbook: tap the Plus button, then Flipbook, and draw frame by frame. You can duplicate frames and add new ones next to the current frame.
A few differences from Animation Assist, per the Dreams handbook:
- Onion skins are turned on from Stage Options, with 1 to 8 frames in each direction and adjustable color and opacity, according to the onion skin help article.
- Frame rate follows the project’s frames per second, set when you create the movie.
- No one-tap loop mode for the flipbook is described. The handbook suggests duplicating frames and using Flip frames to build a back-and-forth motion.
- Drawing filters such as Noise (with a Turbulence setting) add texture, but none of the documented filters animate a line over time.
Dreams is the stronger tool if your wiggle is part of a longer animation with sound and camera moves. For a looping doodle, the method is the same: redraw a few frames.
The shortcut: animated brushes that actually move
If what you want is the wiggle, not the frame work, the fastest route is an app where the motion lives in the brush. That is how Doodraw works. It is a drawing app for iPhone, iPad and Android where every stroke animates the moment you draw it: no Timeline, no duplicated frames, no Liquify passes.
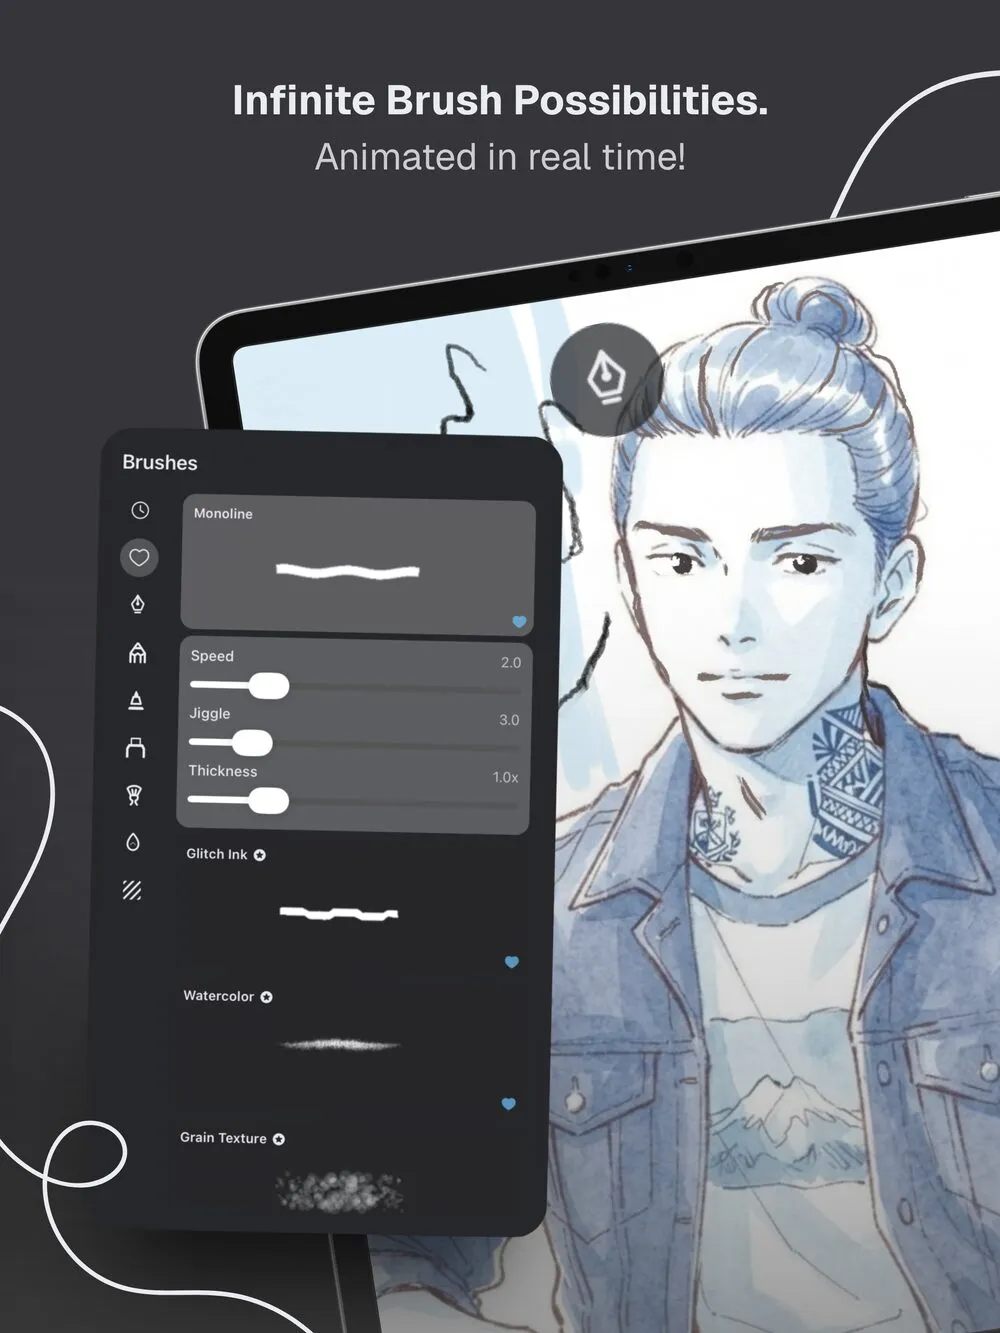
How the wiggle works in Doodraw
- Pick a brush. Crayon and Chalk use a boil motion, where the points of the line jump to slightly new positions a few times per second, like quick redraws. Felt Pen and Trio give a sketchier scribble, and Wobbly Pen gives the whole stroke a tremor.
- Set Speed and Jiggle. Speed controls how quickly the line changes, which is the equivalent of the frame rate in Animation Assist. Jiggle controls how far the line strays, which replaces how loosely you retrace. At Jiggle 0 the stroke stays still, handy for color fills or text that should not move.
- Draw. The line boils as soon as you lift the pen. Undo, erase and redraw like in any drawing app.
- Export. MP4, GIF or Animated PNG up to 1080p, with a duration from 1 to 15 seconds. The transparent background toggle for GIF and Animated PNG is free.
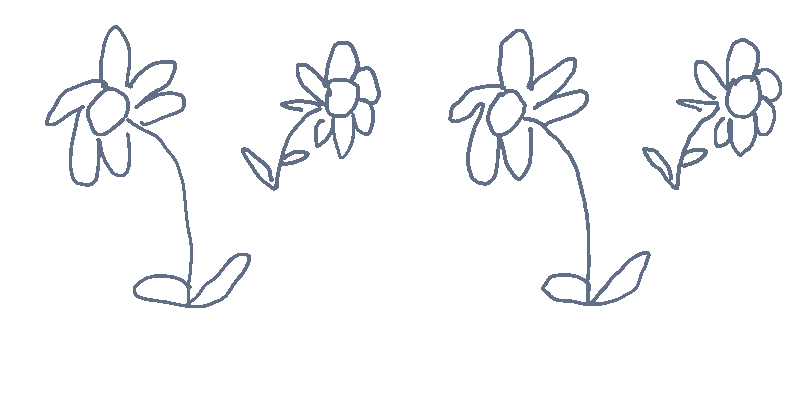
Bring your Procreate drawing into Doodraw
You do not have to choose one app. A useful workflow for Procreate users:
- In Procreate, hide the background color layer and export with Actions, Share, PNG, which the Share page describes as a lossless format that preserves transparency.
- In Doodraw, import that PNG. It lands on its own layer, with its transparency intact.
- Draw animated strokes on top: a boiling outline around your character, wiggling sparkles, moving hatching, a trembling title.
The imported image itself stays still, so this works best when you keep the painted parts in Procreate and draw the lines you want to wiggle in Doodraw.
What Doodraw is and is not
To be fair about it: Doodraw is not a replacement for Procreate’s painting tools, and it has no audio or timeline for long animations. It is built for short, looping, hand-drawn motion. Everything is drawn by you, with no AI.
- Free: download, drawing, animating and exporting. Free exports carry a watermark.
- Doodraw Pro: $3.99 per month, $22.99 per year with a 7-day free trial, or $44.99 once for lifetime (prices vary by country, as of September 2026). It removes the watermark and adds premium animated brushes, a frame-by-frame assistant with onion skin for when you do want to draw frames by hand, per-layer animation controls, and progressive drawing export.
- Devices: iPhone and iPad on iOS or iPadOS 16.4 or later, with Apple Pencil support, and Android on Google Play.
Procreate, Procreate Dreams or Doodraw for wiggle art?
| Procreate (Animation Assist) | Procreate Dreams (Flipbook) | Doodraw | |
|---|---|---|---|
| Brushes animate by themselves | No | No | Yes, every brush |
| Drawings per element | 2 to 4 frames | 2 to 4 frames | 1 stroke |
| Speed control | Frames per second, 1 to 60 | Project frames per second | Speed slider per brush |
| Strength control | How much you change each frame | How much you change each frame | Jiggle slider per brush |
| Transparent export | Animated PNG, GIF, HEVC | Yes, per the Dreams export options | Animated PNG and GIF, free toggle |
| Platforms | iPad (Procreate Pocket on iPhone) | iPad | iPhone, iPad, Android |
| Best for | Painted illustrations with a subtle boil | Longer animations with sound | Fast wiggle art, stickers, social loops |
If you are still choosing a main drawing app, our list of the best drawing apps for iPad compares Procreate with the alternatives. If you like the look but not the frame work, WigglyPaint alternatives covers other apps built around the wiggle.
Tips for a better boil, in any app
- Change less than you think. On a phone screen, a shift of a few pixels already reads as a boil. Big changes look like the drawing is shaking.
- Retrace from the same source frame. In Procreate, always trace from frame 1, so errors do not pile up.
- Keep text calm. Wiggling letters are hard to read. Put text on a Foreground frame in Procreate, or draw it with Jiggle at 0 in Doodraw.
- Not everything needs to boil. A still background makes the moving lines stand out.
- Check the export where you post it. GIF transparency is on or off per pixel, so soft edges can look jagged on colored backgrounds. Animated PNG keeps them clean. Our guide to turning a drawing into a GIF on your phone covers formats in detail.
For more questions about Doodraw itself, see the Doodraw FAQ.
FAQ
Does Procreate have animated brushes?
Not in the sense of brushes that keep moving after you draw. As of September 2026, the Procreate Handbook describes Brush Studio jitter settings that vary each stamp as you paint, but nothing that animates a stroke over time. The wiggle look in Procreate is made with Animation Assist: a few slightly different frames played in a loop.
How do you make the wiggle effect in Procreate?
Draw your line art on one layer, then turn on Animation Assist in Actions, Canvas. Duplicate the frame twice and make each copy slightly different, by retracing it over the onion skin or nudging it with Liquify or Warp. In Settings, choose Loop and a frame rate around 8 to 12 frames per second, then export with Actions, Share, Animated GIF.
Are there Procreate brushes that boil or wiggle by themselves?
Brushes sold as boil, wiggle or shaky line brushes add texture and irregular edges to a stroke, which helps a boil look hand-drawn. The mark itself stays still once painted, so you still need several frames in Animation Assist to make it move. Procreate Dreams has a Wiggle brush set, but its handbook does not describe brushes that animate on their own.
What is the easiest way to get a wiggle effect without drawing frames?
Use an app where the brushes animate themselves. In Doodraw, on iPhone, iPad and Android, every stroke starts moving the moment you draw it, with Speed and Jiggle sliders on each brush. You can also export a PNG from Procreate, import it into Doodraw and draw animated strokes on top.
Can I export a Procreate wiggle animation with a transparent background?
Yes. The Procreate Handbook says Animated PNG and Animated HEVC support transparent backgrounds, and Animated GIF has a transparent background option. Animated MP4 cannot be transparent because each frame is JPEG encoded. Hide the background color layer before exporting.
Try the shortcut
Animation Assist is a great way to learn how a boil works, and worth doing once by hand. When you want the wiggle without the three passes, download Doodraw for free on iPhone, iPad or Android, pick Crayon, and draw your first line that moves on its own.